Hey guys/girls, welcome back this is dhj here, today I have some very cool Idea!.
Are you tired of compressing your images? Don't know how to use the cloud... because nobody understands the cloud? Do you want to go entirely off the "internet grid"? Well I have the solution for you! This recycled laptop hard drive converted to external hard drive for all your storage purposes will give you the space you need with the second hand junk look we all know and love! For just 3 easy payments of 19.... wait. It's FREE! (Oh and props to my friend Brandon for help with the design).
Step 1: Random Stuff You Need
1- 1/8 wood and acrylic to cut
2- Laser cuttable rubber (Optional)
3- Laser cutter
4- 2 Part Epoxy
5- Hammer
6-SATA to usb cable (I got mine of of a spare external hard drive)
7- Computer
8- Laptop Hard Drive
9- Hardcore making skillz! (not really... it's pretty easy)
Step 2: Get the Hard Dive
If you're a cheapskate like me and you really don't want to spend that much (read: any) money, the best way to get a hard drive is to ask around. See if anyone has an old laptop that may not work anymore and see if you can have it. Once you have the laptop you can disassemble it to get all the parts you want out of it. Most importantly the hard drive.
Step 3: Download the Design
Ive included the illustrator designs you'll need for all the parts.
Step 4: Laser Cut!
So you will have to cut twice if you want to use both acrylic and wood. Make sure to know the power settings necessary for your machine. I cut out a full case in both materials so I could mix and match acrylic and wood because why not.
Step 5: Lay Out Your Parts
Each side could have an inlay of the opposite material, but you can choose the lame way too...
Step 6: Gluing the Inlay
So if you used two different materials you can now use them to create cool inlays. All you have to do is take the smaller part and add a spot of two part epoxy on the outside of the part and then lay it into the actual base/top piece on a flat surface.
Step 7: Pin it Together
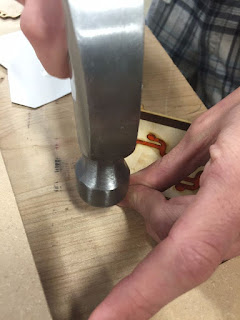
Once the glue drys you will need a hammer and you should lightly tap the pins in place. After you have attached the sides and the bottom together slide in the drive that you are going to use. Now that you have your drive slid in you can tap on the top cover. Your assembly is now complete... and glorious.
Step 8: Set up the Drive
Start by connecting your SATA to usb connector to the drive and to one of the usb ports on your computer. I used a Mac but the process should be similar on Windows. Once you connect, open up disk utility. In disk utility select the drive and go to the partitions tab. Click on the partition layout drop down menu and select one partition. Then you are given the option to name it whatever you would like. Also you can select the format you want the drive to be in. If you only use Mac then journaled will probably be the best for you but if you are a multi operating system user you may want to use FAT32 the one limitation of this format is that you can only add files up to 4gb in size and depending on what you are doing this may not work for you.
Don't forget to like and subscribe me!


0 comments:
Post a Comment